Monday, May 20, 2013

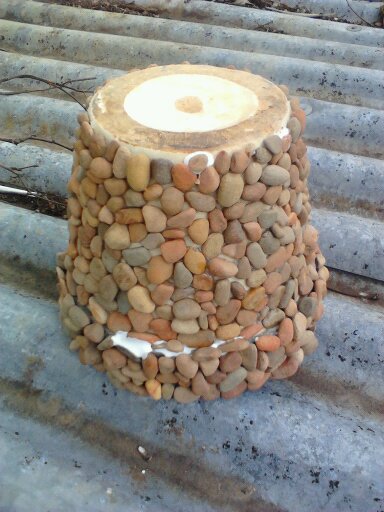
Small Pebble RUNE Pot

Small Pebble
RUNE Pot


Finished item 


Terracotta pot to be used ...


A selection of Runes to be used ...


*  For this project I used small rounded-shaped, different coloured Rune stones 
and quirky-shaped tiny pebbles to fit in between the crevices.


*  Spreading a small amount of glue at a time, 
place each stone to its most comfortable and visual appeal.  


You may find that the ‘right’ pebbles will present themselves to you.

*  Once your project is totally dry and set (one to two days), 
make a weak solution of glue blended with water.  
Use a soft bristled paint or craft brush to blend the water and glue mixture, 
then brush the solution on all areas of your project, 
paying particular attention to the nooks and crannies between each pebble. 
 Allow to dry for a day or two.

*  Using Tile Waterproofing Spray, ensure that all stones are thoroughly covered
 and waterproofed, ideal for outdoor use.  
Allow to dry.


Finished product ...


For more information about 

Elderfuthark RUNES

visit:  
http://elderfutharkrunes.blogspot.com.au/


**

Zig-Zag Pebble Pot

Zig-Zag
PEBBLE POT


Finished project.


Terracotta pot to be used ...


*  Choose a selection of round pebbles and oblong river stones.


*  Draw the desired design on the terracotta pot using a pencil, 
tweaking it here and there to suit your taste.  
With this project I chose to use a mix of stone and decided upon a simple zig-zag design.


*  Spread glue evenly upon the section to be worked on, 
and place pebbles where you wish to achieve your desired effect.


*  Once complete, allow the pot to dry fully ... generally one to two days.

*  Mix a small amount of glue with water in a plastic bowl or tub. 
Using a soft, clean paint or craft brush, stir the solution until all the glue is dissolved 
and a weak, white liquid is achieved.  

*  Gently, yet liberally paint the glue solution into all the crevices between the pebbles, ensuring that every section of the entire project is saturated.  
Allow to dry for at least a day or so.

*  Liberally spray tile waterproofer all over the finished project,
 making sure that you get it into all the tiny gaps between the pebbles.


All finished :)


**


Large RUNE POT

Large RUNE
PEBBLE POT


Finished product 


 Elderfuthark RUNES


*  For this piece I chose to use nicely rounded-shaped, different coloured Rune stones and quirky-shaped smaller pebbles to fit into the tiny crevices.


Old terracotta pot to be used 


*  Spreading a small amount of glue at a time, place each stone to its most comfortable
 and visual appeal.  It’s a little like putting the pieces of a puzzle together, 
with the project evolving and growing as though of its own accord.  


*  Work around the piece section by section until complete.


*  Once your project is totally dry and set (I usually wait at least 24 to 48 hours), 
make a watered-down solution from a small amount of glue blended with water.  
Use a soft bristled paint or craft brush to thoroughly blend the watery mixture. 
Gently brush the solution on all areas of your project, 
paying particular attention to the nooks and crannies between each pebble.  
Allow to dry for a day or two.

*  Using Tile Waterproofing Spray, ensure that all stones area thoroughly sprayed and waterproofed for outdoor use.  Allow to dry.

* All done 

Finished product ...


For more information about 

Elderfuthark RUNES

visit:  
http://elderfutharkrunes.blogspot.com.au/


**

Small Pebble Pot

Small
PEBBLE POT


Finished project


Pebbles to use ...


Small plain ceramic pot
*  I’ve had this plain little ceramic pot for years, 
and decided that it needed a bit of a make-over.  
I was after a quirky looking little pebble pot.


*  Spread glue evenly, section by section as needed, 
and place pebbles randomly as you see fit.  
Beauty is in the eye of the beholder remember :)

*  Allow to dry fully once all pebbles are placed.

*  Using a soft paint or craft brush, blend a small amount of glue with water 
until a white-coloured liquid is achieved.

*  Gently brush this mixture all over the project, 
making sure to fill all nooks and crannies between the pebbles.  
Allow to dry  -  1 to 2 days.

*  Once dry, spray thoroughly with tile waterproofing spray and allow to dry.


*  All done :) 

**

Monday, September 10, 2012

TOOLS and MATERIALS


ADHESIVES
White craft glue (PVA) or a clear silicone adhesive, or specialist indoor-outdoor mosaic glue.  This is used to hold the tesserae in place on the surface.

BRUSHES
A foam brush, bristle paint brush or artist’s paint brush can be used to paint trim and backgrounds for mosaic designs.  When the grout has begun to dry, use a stiff bristle brush to brush away the excess.

CERAMICS and CEMENT
Glazed ceramics and China can be used as a base for mosaic designs.
Terra cotta pots and planters are excellent surfaces for mosaics.
Cement pots, planters, stepping stones and statues decorated with mosaics add a personal touch to any garden or patio area.

CRAFT STICK
A craft stick is used as a glue and adhesive spreader.  (Do NOT use your fingers!)

GLASS and MIRROR
Glass and mirror tesserae can be used on all types of mosaic work.
Mosaics can also be created on glass and mirror as a base, although ensure that it is sturdy and thick.

GROUT FILE
A grout file is a tool for breaking out loose or old grout from a mosaic piece (or tiling joint), in order for the grout to be repaired or replaced.

MALLET
A rubber mallet to break plates or large numbers of tiles into irregular pieces and shapes.  A hammer can also be used, although it does cause more shattering.

METAL 
Metal trays, bowls and pitchers make great surfaces for mosaics.

PATTERN DRAWING SUPPLIES
To draw your own designs, use graph paper, brown craft paper, and transfer paper.  You will also need a rule or circular template, a pencil and a permanent black marker.

PROTECTIVE GEAR
Mosaic material can break into tiny, sharp pieces and can have sharp edges.  Protect your eyes when cutting and breaking tiles, glass, mirror and China by wearing protective goggles.  Wear latex gloves when grouting.

SANDPAPER
Sandpaper is used to remove any rough edges and/or residual grout.

SPREADERS
Use craft sticks or plastic spreaders to spread adhesives on the surface or to apply adhesives to individual tiles.  They can also be used to fill grout into tight places or used to smooth out grout on the edges of finished projects.
To spread grout over the glued tesserae, use a rubber spatula, a squeegee or a plastic putty knife.

SQUEEGEE
A squeegee is a tool for spreading grout.  The spreader has a rubber blade on one edge which helps to force the grout into all the spaces.

SURFACE or SURFACES
The surface refers to the base or background on which tesserae is placed.  It can be made of wood, cement, terra cotta, metal, glass etc. 
Wooden surfaces such as unfinished furniture and accessories such as frames can be bought at craft, furniture, hardware and department stores.  Usable items such as tables, chairs and wooden accessories can be found at garage and yard sales, auctions, second-hand stores and opportunity shops.  
Wooden surfaces need to be sealed with a clear acrylic sealer and allowed to dry before tesserae is applied.

TESSERAE
Tesserae are the tiles, seashells, broken China, mirror and glass pieces, terra cotta or pebbles that are pieced together on a surface to create the design.

TILE CUTTERS
A tile cutter is used to score and break precise, straight cuts on flat tiles, particularly pieces thicker than a centimetre.

TILE NIPPERS  (GLASS NIPPERS)
Tile or glass nippers are used for holding, cutting or breaking tiles, glass, China and the like.  They look and are used much like pliers, with some having round disks and others having sharp blades, and they have spring-action handles.  To use them, grasp the material you wish to break or cut with the nippers.  When the disks or blades are pressed together they crack and break the material.

*ALWAYS wear goggles when nipping pieces of tile, glass or ceramic.

TWEEZERS
Long-handled tweezers can be of help when placing small pieces.

**

GROUT COLOURANTS ADHESIVES and SEALERS


GROUT

MIXING GROUT
When mixing grout use a disposable plastic container and add a small bit of water to the powder little by little, stirring and mixing in between.  Mix with a craft stick or small spatula, and add water until the grout becomes a fudgy consistently ... thick enough not to drop off your stick.

APPLYING GROUT
A small rubber or plastic spatula can be used to apply grout, or you can use your fingers (remember to wear gloves).  Push the grout into every little nook and cranny.
Wipe off excess grout with a dry, soft sponge, and allow to sit for approximately 15 minutes.
Keep a bowl of clean water within reach and rinse the sponge or cloth often as you wipe away excess grout.
Wipe again after 15 minutes, then allow it to dry for another 15 minutes.  Using a soft cloth, wipe away any grout residue and polish the tesserae until it shines.
Once the grout has dried, smooth any rough edges with sandpaper.  Sandpaper can also be used to remove grout from a surface where it doesn’t belong.  However, be careful not to scratch the surface of the tesserae.


COLOURANTS
White grout can be coloured with powder or liquid colourants.  The colourants are mixed with the grout while it is being prepared and blended, prior to the water being added.
Other options for colouring grout include acrylic paints, concentrated food dyes, herbs and spices and glitter to name a few.
You can also colour the grout after it has dried on the mosaic with diluted acrylic craft paint, strong coffee or tea, or liquid fabric dyes (both natural and synthetic).


ADHESIVES
There are a variety of adhesives that can be used with mosaic projects, to glue the tesserae to surfaces.  

PVA GLUE (White Craft Glue)  
This can be used to glue flat materials (such as glass, flatback marbles and tiles) to flat, horizontal surfaces.  This glue holds the pieces securely, flattens out as it dries leaving ample room for grout between the tessarae pieces, and dries clear.

SILICONE ADHESIVE
Silicone adhesive works best on vertical and curved surfaces.  Because silicone adhesive is of a thick consistency, it holds pieces of in place during the drying process.
Silicone adhesive is especially used for ungrouted mosaic effects, and decorative China and glass pieces.  Silicone adhesive is also useful when using materials of different textures and thicknesses.

MOSAIC CRAFT GLUE
Mosaic craft glue works for both indoor and outdoor pieces. 

MASTIC
Mastic is a ready-to-spread adhesive that is applied with a trowel.  Mastic is suitable for mosaics that will be used outdoors, and for large, flat surfaces (such as walls).  It can also be used on projects such as stepping stones.


SEALERS
The grout of mosaics that will be used and kept outside must be sealed.  Grout sealer comes in liquid and spray can forms.
The finished project can be sprayed, ensuring that all of the grout is well soaked.  Wipe the grout sealer off the tesserae with a soft cloth and allow to dry.

LAMINATING LIQUID  (Pour-on RESIN)
Brush on laminating liquid can be used to protect porous surfaces from the elements.  It is simply brushed on, then left to dry.


* ALWAYS read manufacturer’s instructions and safety precautions when using colourants, adhesives and sealers.